A kitchen island is more than just a stylish focal point in a modern kitchen—it’s a multifunctional hub that enhances cooking, storage, and seating. However, for an island to serve its purpose effectively, it must be securely anchored to the floor. A loose or unstable island can cause safety concerns, especially if it holds heavy countertops or appliances. The method of attachment depends on factors such as flooring type, island design, and the presence of utilities like plumbing and electricity. Whether you’re installing a freestanding island or anchoring one with built-in cabinets, proper installation techniques ensure stability, durability, and long-term usability. Kitchen Island Attached To The Floor.
Understanding the Floor Structure
Before installing a kitchen island, it’s essential to assess the type of flooring in your kitchen. Different floor materials require different anchoring methods:
- Wood Subfloors: These provide a solid base for screwing brackets or securing cabinetry directly into the floor joists.
- Concrete Floors: Since you can’t simply screw into concrete, specialized anchors, such as expansion bolts or concrete screws, are required.
- Tile or Laminate Floors: Drilling through tile requires precision to prevent cracking, while laminate may need reinforcement to prevent damage.
Additionally, locating floor joists is crucial. Floor joists act as the backbone of the floor, providing the necessary support to hold the weight of an island. A stud finder can help detect these structural beams, ensuring the island is anchored securely for long-term stability.
Preparing for Installation
Proper preparation is key to a smooth and secure installation. Start by measuring the designated space for the island and marking the placement to ensure proper clearance from surrounding countertops, cabinets, and appliances. A minimum of 36 to 42 inches of walkway space is recommended for comfortable movement.
Once the location is determined, check the floor for levelness. An uneven surface can result in an unstable island. If the floor slopes or dips, shims or adjustable legs may be necessary to level the base before anchoring.
Gathering the right tools and materials is also essential. Depending on the anchoring method, you may need:
- Power drill
- Screws, bolts, or anchors
- Wood shims
- Brackets
- Construction adhesive
Anchoring Methods for Kitchen Islands
There are multiple ways to secure a kitchen to the floor. The method used depends on whether the island is freestanding or built-in with cabinetry.
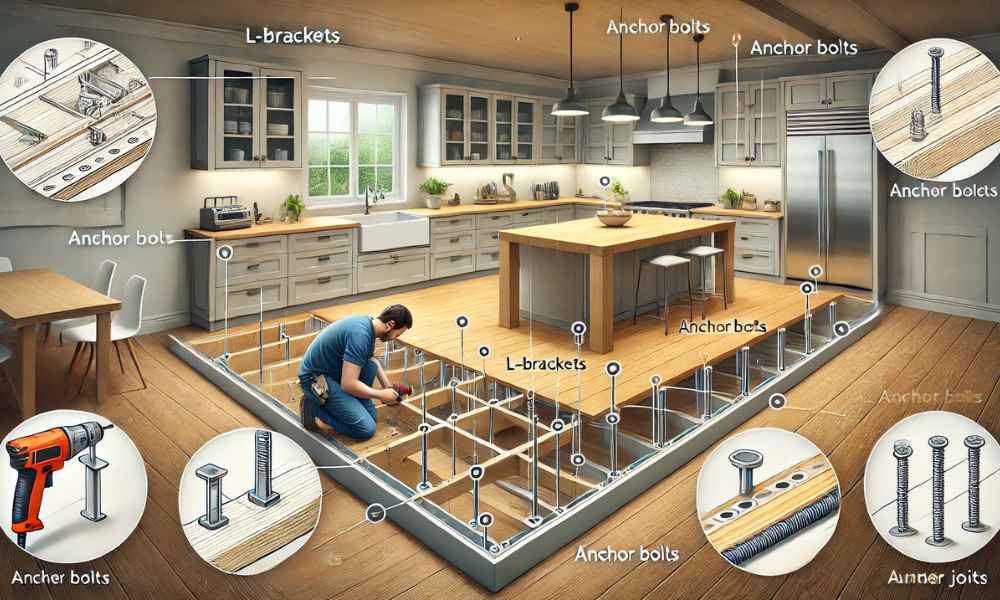
1. Using Brackets and Screws
Metal L-brackets are a common and reliable way to anchor islands. They are attached to the floor and then secured to the island’s base. This method works best for wooden subfloors and is ideal for islands with cabinetry.
2. Securing Through Floor Joists
If the island is placed over floor joists, screws can be drilled through the cabinet base directly into the joists for maximum stability. This method provides extra support, especially for larger islands.
3. Installing on Concrete Floors
For homes with concrete flooring, drilling holes and using anchor bolts or concrete screws is necessary. This method requires special tools, such as a hammer drill, to penetrate the concrete properly.
Securing a Freestanding Kitchen Island
Freestanding kitchen islands, unlike built-in ones, do not always have cabinetry to provide a structural base. However, they still require proper anchoring to prevent movement, especially if they hold heavy materials like granite or quartz countertops.
To secure a freestanding island:
- Use heavy-duty adhesive or construction glue to create a bond with the floor.
- Install anti-slip rubber pads or brackets to prevent shifting.
- Add weight to the base (such as hidden storage or built-in shelving) to increase stability.
Attaching a Kitchen Island with Cabinets
For islands with cabinetry, securing the base cabinets is crucial. This is typically done by:
- Marking the outline of the island on the floor.
- Attaching cleats or wooden blocks to the floor for added support.
- Screwing the cabinets into the cleats or directly into floor joists.
- Ensuring all screws are flush to prevent protrusions that could interfere with flooring.
If the island includes electrical outlets or plumbing, additional measures must be taken to secure wiring and pipes safely. This often involves cutting openings in the cabinet base to accommodate utility connections before fastening the structure in place.
Bolting vs. Gluing: Which Is Better?
Choosing between bolting and gluing depends on the floor type, island weight, and desired level of permanence.
- Bolting: Offers a firm, mechanical hold and is ideal for heavy islands or those with built-in appliances. Bolts can be removed if necessary, allowing for disassembly in the future.
- Gluing: Provides a seamless installation without visible hardware but is best suited for lightweight islands. However, glued islands are more difficult to remove or reposition later.
For maximum stability, a combination of both methods—using bolts for structure and adhesive for additional reinforcement—is often the best approach.
Handling Electrical and Plumbing Considerations
Your kitchen island includes electrical outlets or plumbing fixtures, proper planning is essential before anchoring it to the floor. Electrical wiring must comply with local building codes, often requiring conduit installation beneath the floor. A professional electrician can ensure safe connections and the correct placement of outlets. For plumbing, islands with sinks or dishwashers need water supply lines and drainage pipes, which may involve cutting into the floor. Flexible hoses or PEX pipes are commonly used for easier installation. Before securing the island, confirm that all pipes and wires align correctly within the cabinetry to prevent obstructions. Once everything is in place, securing the island firmly ensures that connections remain stable and leak-free over time.
Installing an Island on Tile or Hardwood Floors
Attaching a kitchen island to tile or hardwood flooring requires careful execution to prevent damage. Tile floors, in particular, are prone to cracking during installation if not handled properly. To avoid this, a pilot hole should be drilled before inserting screws or anchors. Expansion bolts or masonry anchors work best for tile-covered concrete floors, ensuring a strong grip without excessive pressure. For hardwood floors, securing the island involves screwing into the subfloor or joists. A common approach is to install cleats—wooden strips attached to the floor—onto which the island base is screwed. This method prevents direct damage to the flooring while offering a sturdy foundation. If the hardwood expands or contracts with humidity, using flexible adhesive alongside screws provides extra stability.
Adding Support Brackets and Legs for Extra Stability
Depending on the size and weight of your kitchen island, additional support may be necessary. Support brackets and legs enhance stability, especially for islands with heavy countertops such as granite, quartz, or marble. L-brackets, mounted to the floor and underside of the island, prevent lateral movement and reinforce the structure. Decorative support legs not only add aesthetic appeal but also distribute weight more evenly. Adjustable legs are particularly useful for uneven floors, allowing for fine-tuned height adjustments. In open-concept kitchens where the island functions as a dining space, adding a support beam beneath an extended countertop improves durability and prevents sagging.
Finishing Touches After Installation
Once the island is secured, final adjustments ensure a polished and professional look. Sealing gaps between the island base and floor prevents dirt accumulation and enhances visual appeal. If screws or brackets are visible, trim pieces or molding can be installed around the base to conceal them, giving the island a built-in appearance. For islands with electrical outlets, cover plates should be flush with the cabinetry, and any plumbing connections must be checked for leaks. If adhesives were used, allow ample drying time before placing heavy items on the countertop. Finally, cleaning the area thoroughly removes dust and construction debris, leaving the space ready for use.
Troubleshooting Common Installation Issues
Even with careful planning, some challenges may arise during or after installation. If the island wobbles, it may indicate an uneven floor or insufficient anchoring. Shims can be inserted under the base to level the structure before tightening screws. If screws loosen over time, upgrading to longer, more robust fasteners or reinforcing with additional brackets can help. For islands with electrical or plumbing features, unexpected issues like improper alignment or leaks require immediate attention to prevent further damage. Regular inspections of these components ensure continued functionality.
Maintenance and Longevity of Your Kitchen Island
A well-installed kitchen island requires minimal maintenance, but routine checks can prolong its lifespan. Cleaning around the base prevents dust buildup, while inspecting screws and brackets ensures they remain secure. If the island supports a stone countertop, sealing the surface periodically prevents staining and damage. For islands with integrated plumbing, checking for leaks and ensuring proper drainage prevents costly repairs. Wooden islands benefit from occasional refinishing to maintain their appearance. By staying proactive with maintenance, homeowners can keep their kitchen island functional and visually appealing for years.
Conclusion
Attaching a kitchen island to the floor is a crucial step in ensuring stability and longevity. Whether installed on tile, hardwood, or concrete, using the appropriate anchoring methods prevents movement and enhances safety. Islands with electrical and plumbing components require careful planning to integrate utilities without compromising structural integrity. Adding support brackets or legs further strengthens the installation, while finishing touches provide a seamless look. Regular maintenance and troubleshooting minor issues keep the island secure and in excellent condition. By following these steps, homeowners can enjoy a stylish and sturdy kitchen island that enhances their space for years to come.