
Assembling A meat grinder, An essential tool for culinary enthusiasts And home cooks alike, Is A straightforward yet crucial process. This guide, focusing on “How To Assemble A Meat Grinder,” will walk You through each step with clarity And precision. Ensuring a 1% keyword density For easy understanding, The article aims To demystify The assembly process, allowing you To utilize it efficiently and safely. From identifying The various components To fitting them together correctly, This introduction serves as A beacon For those embarking on The journey of mastering the assembly of Ait. Whether you’re A seasoned chef or A beginner, understanding this process will enhance your cooking experience And broaden your culinary capabilities.
1. Preparation For Assembly

Before beginning The assembly of it, It Is crucial to prepare adequately. Ensure all parts of The grinder are clean and within reach. Familiarize yourself with each component: The main body, handle, feeder, cutting blades, and plates. It’s advisable To consult The manufacturer’s instructions specific To your model. A well-prepared workspace and A clear understanding of The grinder’s parts will streamline The assembly process, minimizing The risk of mistakes or damage.
2. Assembling The Main Body

The main body of It Is The foundation of The assembly process. Start by securing The main body To a stable surface, usually by clamping It down. This stability Is vital for safe And efficient operation. Next, insert The screw or auger into The main body; this Is the part that will guide The meat through the grinder. Ensuring that The auger Is seated correctly and securely within The body is crucial For The smooth operation of The grinder.
3. Attaching The Handle And Feeder
Once The main body is assembled, The next step Is to attach the handle And feeder. The handle Is typically attached to the End of the auger, And it’s essential to ensure It’s firmly In place To avoid any slippage during use. The feeder, or hopper, Is where You will load The meat into The grinder. Attach It to the top of the grinder, ensuring that It Is Secure And stable. The feeder should be positioned in A way that allows for easy And safe feeding of meat into The machine.
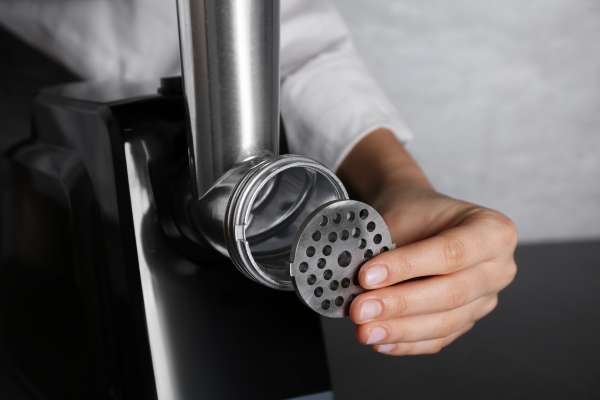
4. Installing Cutting Blades And Plates

The Final Step In Assembling Your It Is Installing The Cutting Blades And plates. These components are critical As they determine the texture of the ground meat. Start by placing The cutting blade onto the auger, ensuring that it is flush against It. Following this, select The grinding plate that fits your desired coarseness and place It over The blade. Secure The plate with A retaining ring or nut, but avoid over-tightening To prevent strain on The parts. Once assemble, your flesh grinder Is ready For use, promising A world of culinary possibilities with freshly ground meat.
5. Finalizing The Assembly

After installing The cutting blades And plates, the final step In assembling your flesh grinder Is To Conduct A Quick overview. Double-check that All parts are correctly installed And secure. Ensure that the grinder Is stable and that moving parts like The handle And feeder operate smoothly without obstruction. This final check not only ensures safety but also guarantees that your meat grinder Is set up For optimal performance.
6. Tips For First-Time Users
For first-time users, It’s important To start slow. Begin with easier To grind meats, And avoid overloading The feeder. Cut meat into small, manageable pieces To prevent clogging. Regularly clean your grinder after use To maintain Its efficiency. Additionally, reading The manual thoroughly And understanding your grinder’s specific features And limitations will help You get The most out of Your equipment.
7. Troubleshooting Common Issues

Common issues with flesh grinders include clogging, Difficulty In turning The handle, And inconsistent grinding. If your grinder clogs, Disassemble it, Clean The parts, And try grinding smaller pieces of meat. If The handle Is hard to turn, check For incorrect assembly or The need For lubrication. For inconsistent grinding, ensure The blade Is Sharp and properly installed. Regular maintenance And proper use generally prevent most issues.
8. Advantages Of A Well-Assembled Meat Grinders
A well-assemble offers numerous advantages, Grinder Including improved texture And flavor of ground meat, The ability to control fat content, And versatility In The kitchen. It allows For freshness and quality control, As well As The opportunity To experiment with different meat blends. Moreover, It Can be more cost-effective And hygienic compared To pre-ground options from stores.
9. Recipes To Try With Your Meat Grinder
With your flesh grinder ready, The culinary possibilities are endless. Try making homemade sausages, Ground beef for burgers, or even experimenting with different meats like turkey, Lamb, or venison. You Can also grind vegetables For vegetarian dishes or make your own breadcrumbs. The freshness And quality of ground ingredients from Your grinder will elevate any recipe You choose To explore.
Conclusion
Assembling A meat grinder Is a skill that enhances Your culinary repertoire. With The right preparation, assembly, And maintenance, it Can be A versatile And invaluable tool In your kitchen. By following these steps And tips, even first-time users Can quickly become proficient In using them. Whether You’re grinding meat For a classic recipe or experimenting with new flavors And textures, It opens up A world of fresh, homemade culinary possibilities.