
Installing cabinet door hinges is A crucial step in the process of upgrading Or remodeling your kitchen cabinets. Proper installation ensures that your cabinet doors function smoothly And align correctly. To start, Gather your tools and materials, including your cabinet hinges, A drill, A screwdriver, A measuring tape, And a pencil. Begin by determining the placement Of your hinges on the cabinet door and frame. Measure And mark the spots where the hinges will install, And pre-drill pilot holes for the screws. Then, Attach the hinges to the cabinet frame and door using the provided screws, making sure they are securely fastened. Finally, Adjust the hinges to ensure that the doors hang evenly and close properly. By following these simple steps, You can install cabinet door hinges with ease and ensure that your cabinets look And function their best.
What Are Cabinet Door Hinges?

Cabinet door hinges are hardware components that connect the cabinet doors to the cabinet frame, Allowing them to swing open and closed. These hinges come in A variety of styles and sizes to accommodate different types Of cabinet doors, including inset, overlay, And partial overlay doors. They are typically made Of metal and consist of two plates that are join by A pin. One plate is attached to the cabinet frame, While the other is attached to the door. The pin allows the two plates to pivot, enabling the door to swing open And closed. Cabinet door hinges are An essential part Of any cabinet, As they allow for easy access to the contents inside while also providing A secure and stable connection between the door and frame.
Pre-Installation Steps
1. Measure And Mark Hinge Placement

Take accurate measurements of the door and frame to determine the hinge placement. Also, Use a straight edge to mark lines on the cabinet door and frame to help guide the placement of the hinges. Double-check your measurements before marking the spots where the hinges will install.
2. Determine The Hinge Type Needed

Different types of hinges are need for different types of cabinet doors. Overlay hinges are use for doors that sit on top of the cabinet frame, while inset hinges are use for doors that sit flush with the frame. Partial overlay hinges are use for doors that partially cover the frame. Be sure to choose the right type of hinge for your cabinet doors.
3. Remove Old Hinges If Necessary

Use a screwdriver to remove the screws that hold the old hinges in place. If the screws are stuck or stripped, use pliers or a drill to remove them. Once the old hinges are remove, clean the area with a damp cloth and let it dry completely before installing the new hinges.
4. Fill Holes If Needed
If the old hinges left holes in the cabinet frame or door, fill them with wood filler and let it dry completely before sanding the area smoothly. If the holes are too large to fill with wood filler, use wooden dowels and glue to fill the holes before sanding.
5. Sand And Prepare the Cabinet Surface

Sand the area where the hinges will be installed with a fine-grit sandpaper. Also, Make sure to remove any old paint, dirt, Or debris from the area. Wipe the area clean with A damp cloth And let it dry completely before installing the new hinges.
Installation Process
Installing The Hinge Plates
1. Align Hinge Plates With Cabinet Door Frame

When aligning the hinge plates with the cabinet door frame, make sure that they are level and straight. You may want to use a level or square to ensure that the hinge plates are align correctly. If the hinges plates are not align correctly, the cabinet door may not close properly.
2. Mark Hinge Screw Holes

Use A pencil to mark the spots where the screws will Be inserted. It is important to mark these spots accurately to ensure that the screws go in straight. You may want to use a center punch to make a small indentation at each spot to help guide the drill bit when pre-drilling the holes.
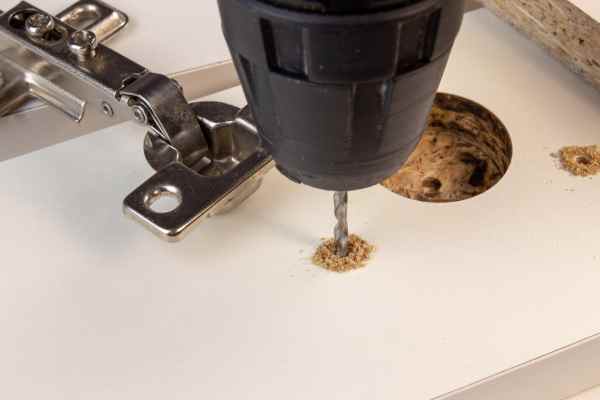
3. Pre-Drill Holes

Pre-drilling the holes will help prevent the wood from splitting And make it easier To insert the screws. Use A drill bit that is slightly smaller than the screws To pre-drill the holes. Also, Be careful not to drill too deep or you may drill through the other side of the door or frame.
4. Secure Hinge Plates With Screws

Insert the screws into the pre-drilled holes And use A screwdriver to tighten them. Also, It is important to make sure that the hinge plate is flush against the cabinet door frame And that the screws are tight. However, Be careful not to over-tighten the screws as this can strip the holes Or damage the wood.
5. Repeat the Process For Each Hinge

In this case, Repeat the installation process for each hinge. Making sure that they are evenly spaced and aligned correctly. Test the cabinet door to make sure that it swings open And close smoothly And that it is align properly with the cabinet frame. If you notice any problems, such as the door rubbing or not closing properly, you may need to adjust the hinges slightly.
Installing The Hinge Cups
1. Determine Cup Depth And Placement

Additionally, The depth of the cup will depend on the type of hinge you are installing. Measure the depth of the hinges cup and mark the drilling depth on your drill bit using masking tape. Also, This will help you To drill the hole To the correct depth. The placement of the hinge cups will depend on the type of cabinet and hinge you are using. Additionally, Refer to the manufacturer’s instructions for The correct placement. Make sure to measure and mark the location of the hinges cup accurately.
2. Mark Cup Placement
Use a pencil to mark the location of the hinge cup on the cabinet frame. Also, Make sure that the location is accurate And that the cup is level with the top Of the cabinet. However, Use a carpenter’s square to ensure that the marks are level and straight. Double check the measurements to ensure that the marks are accurate.
3. Drill Cup Holes
Use a drill bit that matches the diameter of the hinge cup to drill the cup holes. Also, Make sure that the depth of the hole matches the depth of the hinge cup. Use a drill stop or masking tape to ensure that you do not drill too deep. However, Drill the holes slowly and carefully, making sure to keep the drill bit level and straight.
4. Install Hinge Cups With Screws
Once the holes are drilled, insert the hinge cup into the hole and align it with the marks on the cabinets frame. Make sure that the hinge cup is flush with the surface of the cabinet frame. Secure the hinge cup with screws using a screwdriver. Make sure that the hinges cup is secure And that the screws are tight, But be careful not to over-tighten them, As this can strip the holes or damage the wood
5. Repeat the Process For Each Hinge
Repeat the installation process for each hinge, making sure that they are evenly spaced and aligned correctly. Use a level to ensure that the hinges are level and straight. Also, Test the cabinets door to make sure that it swings open And closed smoothly And that it is aligned properly with the cabinet frame. If you notice any problems, Such as the door rubbing or not closing properly, You may need to adjust the hinged slightly.
Attaching Cabinet Doors To Cabinet Frame

1. Align Hinges With Hinge Plates And Cups
Hold the cabinet door in position and align the hinges with the corresponding hinged plates and cups on the cabinets frame. Make sure that the hinges are lined up properly with the hinge plates and cups. However, Use a level to ensure that the door is straight and level with the cabinet frame.
2. Insert Hinge Arms Into Hinge Cups
Once the hinges are lined up, insert the hinge arms into the hinged cups on the cabinets frame. Make sure that the hinged arms slide smoothly into the cups without binding or sticking. If the hinged arms do not fit smoothly, you may need to adjust the hinged plates or cups.
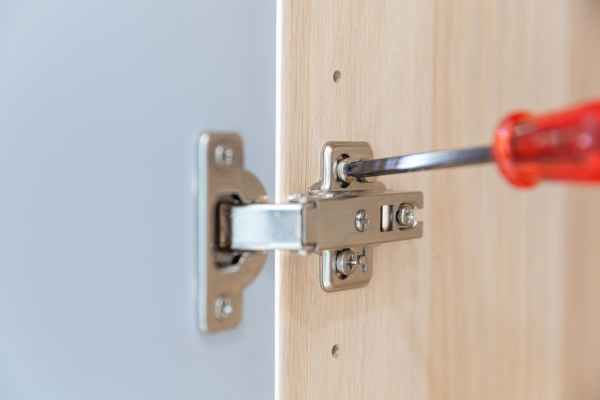
3. Secure Hinge Srms To Hinge Plates With Screws
Once the hinge arms are insert into the cups, use screws to secure them to the hinges plates on the cabinets frame. Make sure that the screws are tight, But Be careful not to over-tighten them, As this can strip the holes Or damage the wood. Use A screwdriver to tighten The screws securely.
4. Repeat the Process For Each Hinge And Door
Repeat the process for each hinge and door, making sure that they are evenly spaced and aligned correctly. Test each door to make sure that it swings open and close smoothly and that it is align properly with the cabinets frame. If you notice any problems, Such as the door rubbing or not closing properly, You may need to adjust the hinged slightly.
Adjusting Hinge Tension
1. Test Door Movement
Before you start adjusting the hinged tension, test the door movement to determine. Whether the tension needs to increased or decreased. If the door swings open too easily, the tension may need to increased. If the door is difficult to open or close, The tension may need to decreased.
2. Adjust Tension Using Hinge Screws
Most cabinets door hinges have screws that can be adjust to increase or decrease the tension. Use A screwdriver to turn the screws clockwise to increase the tension Or counterclockwise to decrease it. Start by turning the screws A quarter-turn at A time, And then re-test the door movement to see if the tension is at the desired level.
3. Re-test Door Movement
After adjusting the hinge tension, re-test the door movement to see if it has improved. If the door still does not move the way you want it to, Continue adjusting the screws A quarter-turn at A time until the desired tension is achieve.
4. Repeat Until Desired Tension Is Achieved
Repeat the adjustment process for each hinges until all of the doors have the desired tension. Remember to test the door movement after each adjustment to ensure that you do not over tighten Or over-loosen the hinges.
The Final Thoughts
Install of cabinet door hinges is crucial for the long-term use and durability of cabinets. The installation process involves pre-installation steps such as measuring and marking hinge placement, determining the hinge type needed, adjust old hinges if necessary, filling holes if needed, and sanding and preparing the cabinets surface. The actual installation process includes aligning and securing hinge plates and cups, attaching cabinet doors to the frame, and adjusting hinged tension. Tips for proper installation include using the right tools and hardware, double-checking measurements and alignment, and seeking assistance from a professional if needed. Online resources And tutorials are also available for those who want to learn more about hinged installation. Overall, following the proper installation process and making adjustments as needed can help ensure that cabinets look and perform their best for years to come.