
Install overlay cabinet hinges is a crucial aspect of cabinet door installation. When done correctly, It ensures that the hinges are securely mounted And aligned, Allowing the doors to open and close smoothly. Overlay hinges are a popular choice for cabinet doors due to their various advantages. These hinges provide improved accessibility, allowing full access to the cabinet’s contents. They also offer easy adjustment options for proper door alignment. Moreover, overlay hinges contribute to a clean and streamlined appearance, enhancing the overall aesthetic appeal of your cabinets. By following the appropriate installation process, you can achieve both functional and visually pleasing cabinet doors.
What Is An Overlay Cabinet?
An overlay cabinet is a cabinet design where the cabinet doors are installed to overlap or cover the cabinet frame when closed. This style creates a visually pleasing and streamlined appearance, as the doors fully or partially conceal the frame. Overlay cabinets are favored for their modern and contemporary look, providing a seamless and clean surface. They offer advantages such as increased storage space, easy installation, and improved accessibility to the cabinet contents. The overlay size can vary, allowing for customization based on personal preference and desired aesthetic.
The Benefit Of Overlay Cabinet Hinges For Cabinet Doors

Overlay cabinet hinges offer several benefits for cabinet doors. Here are four key advantages:
Improved Accessibility: Overlay hinges allow cabinet doors to fully cover the cabinet frame, providing better accessibility to the contents inside. With overlay hinges, you can easily reach and retrieve items from the cabinets without any obstructions from the frame. This makes it more convenient to organize and access your belongings.
Easy Adjustment: Overlay hinges come with adjustment features that allow you to fine-tune the alignment and position of the cabinet doors. This is particularly useful when dealing with uneven or misaligned cabinets doors. With a simple adjustment, you can ensure that the doors are properly aligned and function smoothly, eliminating any gaps or overlapping.
Versatile Design Options: Overlay hinges come in various styles and finishes, offering versatility in design. Whether you prefer a traditional, contemporary, or modern look for your cabinets, there are overlay hinges available to complement your preferred aesthetic. The wide range of design options allows you to personalize and enhance the overall style of your cabinetry.
Streamlined Appearance: One of the significant advantages of overlay hinges is the clean and streamlined appearance they provide. With the doors fully covering the cabinet frame, the pivot remain concealed from view when the doors are closed. This creates a visually pleasing and cohesive look for your cabinets, contributing to an overall polished and professional appearance in your kitchen or bathroom.
Overlay Cabinet Hinges

1. Definition And Types Of Overlay Cabinet Hinges
Overlay cabinet hinges are a type of pivot specifically designed for cabinet doors that overlap or overlay the cabinet frame when closed. These hinges are responsible for attaching the doors to the cabinet frame while allowing them to open and close smoothly. There are different types of overlay hinges, including:
Full Overlay Hinges: These hinges are used when the cabinet doors completely cover the cabinets frame, leaving little to no gap between adjacent doors.
Half Overlay Hinges: Half overlay hinges are suitable when the cabinet doors partially cover the cabinets frame, leaving a visible portion of the frame between adjacent doors.
Inset Overlay Hinges: Inset overlay hinges are used when the cabinet doors are flush with the cabinets frame but still overlap slightly, creating a small gap between adjacent doors.
2. Different Hinge Options Based On Door Overlay Measurements
Different Hinge Options Based On Door Overlay Measurements:
The hinge options for overlay cabinets vary based on the specific measurements of the door overlay. Common options include:
180-Degree Hinges: These pivot allow the door to open a full 180 degrees, providing maximum accessibility to the cabinet contents.
90-Degree Hinges: A 90-degree pivot limit the door’s opening angle to 90 degrees, making them suitable for cabinets with limited space or where full access is not necessary.
Variable Overlay Hinges: These pivots are adjustable and can accommodate different overlay measurements, making them versatile for various cabinet designs.
3. Key Components And Features Of Overlay Cabinet Hinges
Overlay cabinet hinges consist of several key components and features, including:
Mounting Plates: These plates attach to the cabinet frame and provide a secure mounting point for the hinge.
Hinge Arms: The arms of the hinge connect the mounting plate to the door, allowing it to pivot and open or close.
Soft-Close Mechanism: Many overlay hinges come with a soft-close feature, which ensures that the cabinets doors close gently and quietly.
Adjustable Screws: Overlay hinges often have adjustable screws that allow for fine-tuning the alignment and positioning of the doors to achieve a precise fit.
Preparing For Installation

1. Gathering Necessary Tools And Materials
Before beginning the installation process, gather the required tools and materials. This may include a screwdriver (either manual or electric), measuring tape, pencil or marker, drill (if necessary), overlay hinge set, mounting plates, screws, and any additional hardware specific to your hinge type. Having all the necessary tools and materials ready will make the installation process more efficient.
2. Removing Existing Hinges (If Applicable)
If you are replacing existing hinges with overlay hinges, you’ll need to remove the old hinges first. Carefully unscrew and remove the existing hinges from both the cabinet frame and the door. Take note of the position and placement of the old pivot, as this will help during the installation of the new overlay hinges. Ensure that the door is fully supported during this process to prevent any damage.
3. Assessing Door And Cabinet Frame Conditions
Before proceeding with the installation, assess the condition of both the cabinet door and the cabinets frame. Check for any damage, such as cracks, warping, or loose parts, that may affect the installation or performance of the overlay hinges. Ensure that the door and frame are clean and free from any debris or obstructions that could hinder the hinge installation or operation. If necessary, address any repairs or adjustments before proceeding with the hinge installation.
Marking And Aligning Hinge Placement
1. Determining Hinge Placement On The Door
Consider the type and size of the overlay hinge you are using, as well as the desired positioning of the cabinet door. Typically, the pivot will be placed on the back edge of the door, allowing it to swing open and close smoothly without obstructing the cabinet frame. Measure and mark the desired hinge placement on the door, taking into account any design preferences or functional requirements.
2. Marking Reference Points For Hinge Installation
To ensure accurate and consistent placement of the hinges, mark reference points on both the door and the cabinets frame. Start by aligning the door with the cabinet frame in the closed position. Use a measuring tape or pivot template (if provided) to determine the appropriate distance from the top and bottom edges of the door to the hinge placement. Mark these reference points on the door and transfer them onto the corresponding positions on the cabinet frame.
3. Ensuring Proper Alignment And Symmetry
Verify the alignment and symmetry of the hinge placement by using a level or straight edge. Check that the marked reference points on both the door and cabinet frame are parallel and level. Make any necessary adjustments to ensure proper alignment and symmetry before proceeding with the installation.
Drilling Holes

1. Selecting The Appropriate Drill Bit Size
Choose a drill bit that matches the size of the screws provided with the overlay hinges. Typically, the drill bit should be slightly smaller in diameter than the screws to ensure a secure fit. Refer to the manufacturer’s instructions or the packaging of the pivot to determine the recommended drill bit size.
2. Pre-Drilling Holes For The Screws
Before attaching the hinges, pre-drill pilot holes for the screws in both the door and the cabinets frame. This will help prevent the wood from splitting and make it easier to insert the screws. Use a drill with the selected drill bit to create pilot holes at the marked reference points.
3. Ensuring Correct Hole Placement And Depth
Ensure that the pre-drilled holes are placed accurately according to the marked reference points for the hinge placement. Use a depth gauge or tape on the drill bit to ensure consistent hole depth. The depth should be slightly shorter than the length of the screws to allow for a secure attachment without protruding through the surface.
Installing The Hinges

1. Attaching The Hinge Plates To The Cabinet Frame
Begin by attaching the hinge plates to the cabinets frame using the pre-drilled pilot holes. Align the hinge plates with the marked reference points on the frame and insert the screws through the holes. Tighten the screws using a screwdriver or drill, ensuring that they are snug but not overtightened, as it may affect the movement of the door.
2. Securing The Hinge Cups On The Door
Next, secure the hinge cups on the door. Position the hinge cups at the marked hinge placement on the back edge of the door. Insert the screws through the hinge cups and into the pre-drilled pilot holes on the door. Again, tighten the screws securely but avoid overtightening.
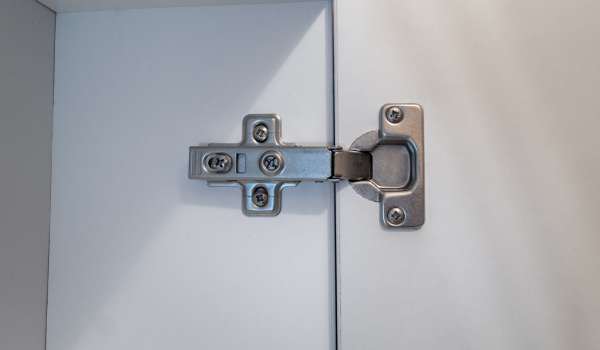
3. Aligning And Connecting The Hinges
With the hinge plates attached to the cabinet frame and the hinge cups secured on the door, align the hinge arms of the hinge plates with the hinge cups. Carefully line up the hinge arms and slide them into the cups, ensuring a proper fit. Once aligned, connect the hinges by fully inserting the hinge arms into the cups. Test the movement of the door to ensure it opens and closes smoothly without any obstruction or misalignment.
Adjusting The Hinges

1. Checking The Door Alignment And Smooth Movement
After installing the overlay hinge, check the alignment of the cabinets doors in relation to the cabinets frame. Ensure that the doors are level, properly positioned, and have an even gap between adjacent doors. Additionally, test the movement of the doors to ensure they open and close smoothly without any sticking or rubbing.
2. Making Necessary Adjustments For Proper Fit
If you notice any misalignment, uneven gaps, or issues with the door movement, adjustments may be required. Most overlay hinges offer adjustment options to fine-tune the door position. Common adjustment mechanisms include screws for vertical and horizontal alignment, as well as depth adjustment for the door’s position relative to the cabinet frame. Refer to the manufacturer’s instructions for specific adjustment methods and use the appropriate tools to make the necessary tweaks.
3. Testing The Door’s Opening And Closing Motion
Once you have made the adjustments, test the doors’ opening and closing motion again. Check for smooth operation, proper alignment, and consistent gaps between doors. Repeat the adjustment process if needed until you achieve the desired fit and functionality.
Securing And Finalizing The Installation
1. Tightening The Screws For A Secure Fit
After adjusting the hinges and verifying the door alignment, ensure that all screws are properly tightened. Use a screwdriver or drill to securely fasten the screws on both the hinge plates attached to the cabinets frame and the hinge cups on the door. Be careful not to overtighten, as it may damage the wood or strip the screws.
2. Verifying That The Door Sits Evenly And Closes Properly
Once the screws are tightened, carefully inspect the door to ensure it sits evenly and aligns properly with the cabinets frame. Check that the gaps between adjacent doors are consistent and visually appealing. Open and close the door to confirm that it moves smoothly without any sticking or misalignment. If necessary, make minor adjustments to achieve the desired fit.
3. Inspecting The Hinges For Any Additional Adjustments Or Tightening
Take a close look at the hinges and inspect them for any signs of movement or looseness. Gently wiggle the door to check if there is excessive play in the hinges. If needed, make additional adjustments or tighten the screws slightly to eliminate any movement. This will ensure that the hinge remain stable and secure.
Troubleshooting And Tips
1. Addressing Common Installation Issues And Challenges
a) Uneven Gaps: If you encounter uneven gaps between adjacent doors, try adjusting the hinge screws. Loosening the screws slightly on one side and tightening them on the other can help align the doors and create consistent gaps.
b) Sticking or Rubbing Doors: If the doors stick or rub against the cabinet frame, check for any obstructions or interference points. You may need to adjust the position or alignment of the hinges to create clearance and allow for smooth movement.
c) Sagging Doors: Over time, heavy or frequently used cabinet doors can sag. To address this, consider using hinge adjustment mechanisms (if available) to slightly lift the door and create a more level position.
2. Ensuring Long-Term Functionality And Durability
a) Regular Maintenance: Periodically check the hinge for any signs of wear, such as loose screws or worn components. Tighten any loose screws and lubricate the hinge mechanism with a silicone-based lubricant if necessary.
b) Avoid Overloading: Be mindful of the weight capacity of the hinges and avoid overloading the cabinet doors with excessive weight. Distribute the contents evenly within the cabinets to prevent strain on the hinge.
c) Gentle Operation: Encourage gentle handling of the cabinet doors by family members or users. Avoid slamming or forcefully closing the doors, as it can lead to premature wear and tear on the hinge.
The Final Thoughts
The proper installation of overlay cabinet hinges is crucial for achieving a professional and functional hinge installation. It ensures smooth functionality, enhances the aesthetics of the cabinets, promotes durability, and extends the lifespan of the hinges. By paying attention to detail, following the manufacturer’s guidelines, and exhibiting a meticulous approach, you can achieve a high-quality hinge installation that meets both functional and visual requirements, ensuring a satisfactory long-term experience with your cabinet doors.