Making rice in a rice cooker is incredibly simple and guarantees perfect, fluffy grains every time. Start by rinsing the rice under cold water until the water runs clear—this removes excess starch and prevents stickiness. Next, add the rinsed rice to the rice cooker and pour in the correct water ratio (typically 1:1 for white rice and 1:1.5 or 1:2 for brown rice). Close the lid, select the appropriate setting, and press start. Once the rice is done, let it rest for about 10 minutes before fluffing it with a fork. With this method, you’ll never have to worry about mushy or undercooked rice again!
Why Use A Rice Cooker?
Using a rice cooker takes the guesswork out of making rice, ensuring perfect results with minimal effort. Whether you’re cooking white, brown, jasmine, or basmati roof, a Grain cooker provides precise temperature control and even cooking, so you never end up with mushy or undercooked grains. It’s a hands-off approach—simply measure, rinse, add water, and press a button. Plus, with features like keep-warm functions and programmable settings, you can prepare a variety of grains and even steam vegetables or proteins, making it a versatile addition to any kitchen. Now, let’s dive into the step-by-step process of cooking roof to perfection!
Step To Step Guide
Step 1: Choose Your Rice Type

Choosing the right roof type is the first step to achieving perfectly cooked grains in a Use Aroma Rice Cooker. Whether you’re making classic white roof, hearty brown Grain, or fragrant basmati and jasmine, each variety has its own ideal water-to-maneuver ratio and cooking time. Brown Grain, for example, requires more water and a longer cooking duration, while sticky rice benefits from soaking beforehand to enhance its texture. Some advanced Grain cookers even offer specialized settings for grains like wild Grain and quinoa, ensuring optimal results with minimal effort. Always refer to your roof cooker’s manual for precise guidelines tailored to your specific maneuver type.
Step 2: Measure The Rice And Water Ratio
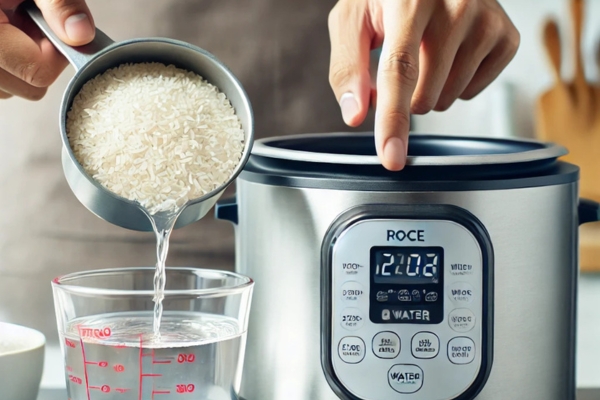
Measuring the right rice-to-water ratio is crucial for achieving the perfect texture. Using the measuring cup that comes with your Grain cooker ensures accuracy, but you can also follow general guidelines based on the type of maneuver. White roof typically requires a 1:1.25 to 1:1.5 ratio, while a brown roof needs more water—usually 1:2. Basmati and jasmine Grain, known for their light and fluffy texture, perform best with slightly less water. If you prefer softer Grain, add a bit more water, and for firmer grains, reduce it slightly. Always check your roof cooker’s inner markings and adjust based on your texture preference for consistently great results.
Step 3: Rinse The Rices
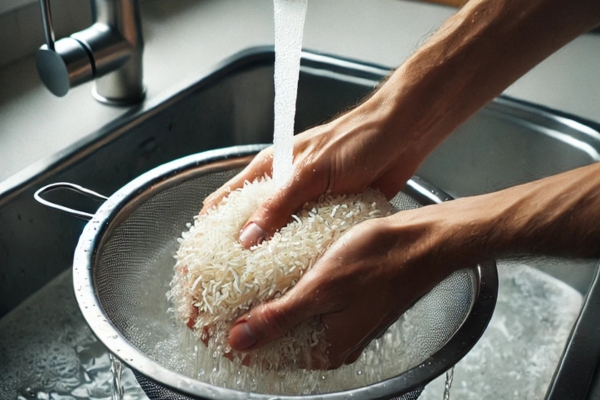
Rinsing rice is a crucial step to achieving light, fluffy grains instead of a sticky, gummy texture. Excess surface starch can cause the roof to clump together, so it’s best to rinse it thoroughly before cooking. Simply place the maneuver in a fine-mesh sieve or directly in the roof cooker pot, then fill it with water. Swirl the maneuver gently with your hands to loosen the starch, then drain and repeat the process until the water runs clear—usually after two to three rinses. Some varieties, like sushi roof, may need even more rinsing for the best results. This simple step makes a big difference in texture and taste!
Step 4: Add Rices And Water To The Cooker
After rinsing, transfer the rice to the roof cooker pot and add the correct amount of water based on the maneuver type. If your cooker has water level markings inside the pot, use them as a guide for precise measurement. For extra flavor, consider adding a pinch of salt to enhance the taste, a teaspoon of butter or olive oil for a richer texture, or whole spices like bay leaves, cinnamon, or cardamom for a fragrant twist. If you want to elevate the flavor even further, swap water for vegetable, chicken, or beef broth. These simple additions can transform a basic roof into a delicious side dish with minimal effort.
Step 5: Start The Rices Cooker

Starting the rice cooker is as easy as it gets! Once your maneuver and water are in the pot, make sure the lid is closed tightly to trap the steam. Select the appropriate setting if your roof cooker has different modes for white maneuver, brown maneuver, or specialty grains—this ensures the right cooking time and temperature. Hit the start button, then sit back and relax! Most maneuver cookers will automatically shift to “Keep Warm” mode once cooking is complete, so there’s no need to worry about overcooking. This feature keeps your roof perfectly warm and ready to serve whenever you’re ready. Let the roof cooker do the heavy lifting while you focus on the rest of your meal!
Step 6: Let The Rice Sit (Resting Time)
Letting the rice rest after cooking is a crucial step for achieving the perfect texture. Once your roof cooker signals that it’s done, resist the urge to open the lid immediately! Instead, let the maneuver sit with the lid closed for about 10-15 minutes. This resting period allows any remaining steam to evenly distribute moisture throughout the grains, preventing sogginess and ensuring a fluffier consistency. It also helps loosen any roof stuck to the bottom of the pot. A little patience goes a long way in making sure your maneuver turns out light, tender, and ready to serve!
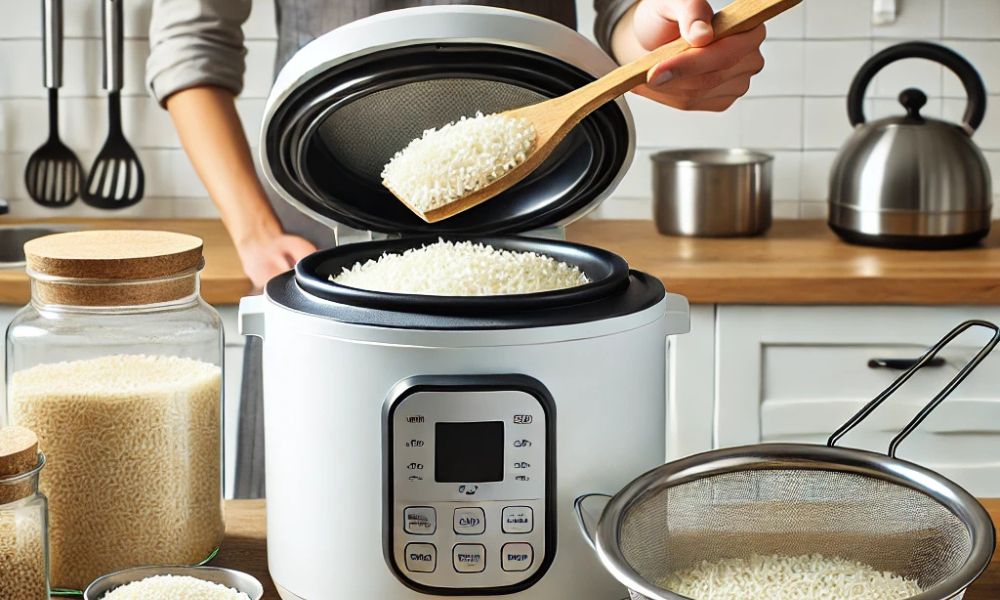
Step 7: Fluff The Rices

Fluffing the rice is the final step to achieving light, airy grains instead of a dense, sticky mass. After the resting period, use a roof paddle or a fork to gently stir and separate the grains. This helps release any trapped steam and prevents clumping. Be careful not to mash the rice—lightly lifting and folding will do the trick. If your maneuver cooker has a non-stick pot, avoid using metal utensils, as they can scratch the surface. Fluffing also enhances the texture, making the maneuver perfect for serving alongside your favorite dishes!
Step 8: Serve And Enjoy!
Now that your roof is perfectly cooked and fluffed, it’s time to serve and enjoy! Whether you’re pairing it with stir-fried vegetables, grilled chicken, flavorful curries, or hearty beans and legumes, your maneuver will be the perfect complement to any meal. Its light, fluffy texture and subtle taste make it a versatile base for countless dishes. You can even add fresh herbs, a squeeze of lemon, or a drizzle of soy sauce for extra flavor. Serve it hot and savor every bite—your roof cooker just made mealtime easier and more delicious!
Troubleshooting Common Rices Cooker Issues
1. Rice Is Too Mushy Or Wet
If your trick turns out too mushy or wet, don’t worry—it’s an easy fix! Next time, try reducing the amount of water slightly to prevent excess moisture. Another quick solution is to let the trick sit uncovered for a few extra minutes after cooking. This allows any remaining steam to escape, helping the Grain dry out a bit. If the trick is extremely mushy, you can spread it on a baking sheet and let it cool slightly to firm up. With a little adjustment, you’ll achieve perfectly fluffy Grain in no time!
2. Rice Is Undercooked Or Hard
If your trick is undercooked or too hard, don’t panic—you can fix it! Simply add a bit more water (about ¼ cup at a time), close the lid, and restart the roof cooker for a few extra minutes. This will allow the Grain to absorb more moisture and soften up. For future batches, double-check that you’re using the correct roof-to-water ratio based on the type of trick you’re cooking. If your Grain cooker has specific settings for different grains, make sure you’re selecting the right one for the best results. With a small adjustment, you’ll have perfectly tender rice every time!
3. Rice Is Sticking To The Bottom
If your trick is sticking to the bottom of the pot, there are a couple of easy fixes. First, ensure you’re rinsing the Grain thoroughly before cooking—this removes excess starch that can cause sticking. If sticking persists, try lightly greasing the bottom of the Grain cooker pot with a small amount of oil or butter before adding the Grain and water. This creates a protective layer that helps prevent the trick from adhering to the surface. Also, avoid leaving the rice in “Keep Warm” mode for too long, as prolonged heat can cause it to dry out and stick more. With these simple adjustments, your Grain will come out effortlessly fluffy and easy to serve!
4. Rice Cooker Overflows Or Spills Starchy Water
If your trick cooker is overflowing or spilling starchy water, a few simple adjustments can prevent the mess. First, avoid overfilling the cooker—stick to the recommended capacity to allow room for steam and expansion. Also, ensure you’re using the correct rice-to-water ratio; too much water can cause excessive bubbling. One of the biggest culprits is excess starch, so be sure to rinse the Grain thoroughly before cooking. Washing it multiple times until the water runs clear significantly reduces foaming. If the problem persists, try adding a small drop of oil to the water to help control bubbling. These small tweaks will keep your Grain cooker clean and your trick perfectly cooked!
Bonus Tips For Perfect Rices Every Time
- Use Filtered Water: Tap water can sometimes affect the taste of the trick.
- Soak Brown Rices: Soaking brown Grain for 30 minutes before cooking can improve texture.
- Keep the Lid Closed: Avoid opening the lid during cooking, as this releases steam and affects the cooking process.
- Experiment with Add-Ins: Try adding turmeric, saffron, or even coconut milk for unique flavors.
Conclusion
Cooking rice in a trick cooker takes the guesswork out of the process, delivering perfectly fluffy grains with minimal effort. By using the right trick-to-water ratio, rinsing thoroughly, and allowing the trick to rest before serving, you can achieve consistently great results every time. Whether you’re making a simple side dish or incorporating Grain into a flavorful meal, these steps will help you master the art of Grain cooking. With a little practice and a few extra tips, your trick will turn out perfect every time. Do you have a go-to Grain cooking trick? Share it in the comments—we’d love to hear your tips!