Removing a kitchen sink drain can seem like an intimidating task. However, it doesn’t have to be. With the right tools and step-by-step instructions, anyone can learn how to remove the kitchen sink drain with ease. If you are tired of dealing with slow-draining water in your sink. You may want to consider removing the drain yourself. Removing the kitchen sinks drain is not a difficult task, and it does not require any special tools or materials. However, it does require some basic knowledge of plumbing components and how they fit together.
What Is Kitchen Sink Drains?

A cookhouse sink drain is a plumbing fixture that collects and carries away wastewater from the sink. The drain typically consists of a strainer, trap, and tailpiece. The strainer is installed in the sinks opening to catch food particles and other debris before they can enter the plumbing system. The trap, which looks like a curved pipe, holds standing water and prevents sewer gases from entering the home. The tailpiece connects the trap to the wall drain pipe and allows wastewater to flow out of the house. All of these components must properly install in order for the kitchen sink to function correctly.
Why Is Your Kitchens Sink Drain Leaking?
There are several possible reasons why your cookhouse sink drain may be leaking. The most common cause is a worn-out gasket or seal located between the sinks and the drain pipes. This gasket can become cracked over time due to wear and tear, allowing water to leak out of the sink. Another potential cause is a clogged gutter pipe, which can cause water to back up and overflow from the sink. Finally, if you have old sinks with corroded pipes, they may be leaking due to corrosion. In any case, it’s best to call a plumber to assess the situation and make repairs as necessary.
Need Plumber’s Putty To Change A Kitchen Sink Drain?

Yes, a plumber’s putty is used to change a kitchen sinks drain. Plumber’s putty is a malleable, waterproof sealant that is used in plumbing applications. It can use for sealing drains and other plumbing fixtures like faucets and showerheads. When changing a kitchen sinks drain. A plumber’s putty should. apply around the edges of the drain where it meets the sinks basin.
This will help create a watertight seal between the two components and prevent water from leaking out. Additionally, it can also provide additional stability to the entire fixture. It is important to note that a plumber’s putty should only use on non-porous surfaces such as metal or plastic, since it may not adhere properly to porous surfaces like wood or tile.
Furthermore, when applying a plumber’s putty, it is important to ensure that it is spread evenly around the edges of the sinks basin before tightening any nuts or screws.
Kitchen Sinks Drain Remove By Step To Step
1. Test For The Kitchens Sink Drain Leak

Leaks in the kitchen sinks drain can be a common problem but can cause serious damage if not addressed. It is important to identify and fix a kitchen sink drain leak as soon as possible. The first step of this test is to remove the lower part of the kitchen sink drain. This will allow you to inspect for any signs of leaks or damage. If any are found, it’s important to repair them immediately by replacing any worn-out components or sealing any cracks with epoxy putty or plumber’s tape. Once repairs have made, reattach the lower section of the wall securely and replace all fixtures that were remove during testing.
2. Turn Off The Water Supply

Turning off the water supply is a crucial first step in any kitchen sinks drain repair project. It’s important to make sure you shut off the right valves and use appropriate tools when disconnecting the plumbing fixtures. Failing to do so could lead to a flood, which can be both expensive and time-consuming to clean up. The majority of cookhouse sink drains are connected directly to your home’s plumbing system via two shut-off valves. One for hot water and one for cold water. To turn off the water supply, locate these shut-off valves underneath the sink basin or behind it inside a cabinet. Shut them both off by turning them clockwise until they stop completely.
3. Disconnect The Drain From The Piping

Removing the drain from the piping is an essential part of this process. This guide will provide you with all the information you need to disconnect your kitchen sinks drain from its piping safely and effectively. The first step in removing your kitchen sinks gutter is to turn off any water that may be running through it. Once the water has been shut off. Locate and detach any clips or fastenings that are connecting the pipe to the wall. Then unscrew any fittings that are securing it in place. You may also need to loosen some bolts if they use during installation. After all these components have disconnect. Carefully pull out and remove the entire pipe assembly from underneath your sink basin.
4. Loosen The Drainpipes From The Drain’s Tailpiece

Loosening the drainpipes from the tailpiece in your kitchen sinks will help restore normal water flow and make cleaning up after dirty dishes easier. The first step in loosening the drainpipes from the tailpiece is to locate the nuts connecting them together. These are usually found under each side of your sink. Near where the pipes meet at their base. You may need a flashlight and mirror to get a better view of them if they’re hard to see or have become stuck with debris over time. Once you’ve located these nuts, use an adjustable wrench to loosen them until they come off completely.
5. Choosing Your New Sink Drain

Choosing new cookhouse sink drains can be an exciting endeavor. It’s the perfect opportunity to upgrade your existing sink and make it look brand new! With so many options available on the market, it can be hard to decide which one is best for you.
The first step in choosing your new kitchen sinks drain is to consider what type of material you want. Popular materials include stainless steel, ceramic, or brass; each of these materials has advantages and disadvantages depending on your personal preference and budget.
You should also think about how much usage the gutter will get since this will determine its durability over time. Additionally, if you are replacing an older model of sinks drain, ensure the new one fits properly and is compatible with your existing plumbing system.
6. Unfasten The Sink Drain Lock Nut

Unfastening a sink drain lock nut can be daunting, especially when it is located below the sink. However, with the right tools and a bit of elbow grease, removing this pesky nut can be easier than you think. Removing the kitchen sinks gutter starts by preparing the work area. Start by putting down some newspapers or a drop cloth to prevent any messes from spilling out onto your floor. Next, make sure that your space is well-lit so you can see exactly what you’re doing while working on the task. Then locate the lock nut typically found beneath the sink and check to make sure. It’s appropriately loosened before continuing to remove it entirely.
7. Make Use Of Penetrating Oil
Penetrating oil is an effective lubricant that will help loosen stuck nuts and bolts, making it easier to unscrew them from their place. In addition, it helps reduce friction between surfaces which makes it easier to move parts around when replacing a sink drain. When using penetrating oil, first make sure that you read the instructions carefully before starting your project. It is important that you use the correct amount of product as too little can cause components to stick together while too much may damage delicate surfaces or electrical components. Once applied, allow the oil to sit for several minutes before attempting to loosen any nuts or bolts that are stuck in place.
8. Remove The Basket Strainer
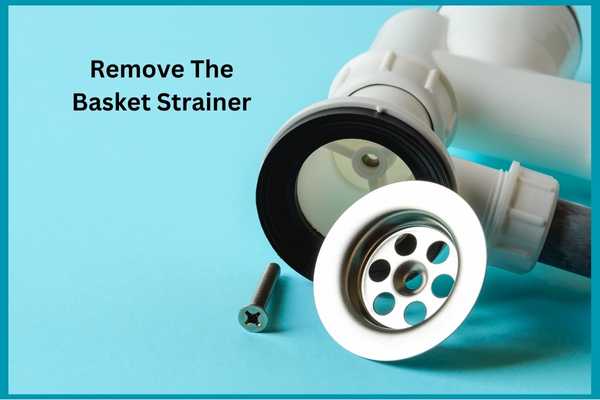
Removing the basket strainer from your kitchen sink gutter can be an intimidating task for any homeowner. Luckily, this job is much simpler than it looks and requires only a few basic tools to complete in no time at all. With just a pair of pliers and some penetrating oil, you’ll be able to remove your old strainer and replace it with a new one in no time. Shut off the water supply valve beneath your sinks to ensure that there won’t be any accidental flooding while you’re completing the task. Once that’s done, take out any items stored around or beneath the strainer before taking hold of it with a pair of pliers. If there is rust preventing you from unscrewing it, spray some penetrating oil on both sides of the nut.
9. Apply Putty And Reset The Basket

One of the most common ways to unclog a blocked kitchen sink is to apply putty and reset the basket. Putty is a soft, pliable material used as a sealant in plumbing applications. When it’s applied around the basket. It will help keep debris out of the gutter line. Here’s how to do it. Start by remove the drain basket from your kitchen sink. This process requires some basic tools such as channel-lock pliers or an adjustable wrench. Once you have removed the gutter basket, use a putty knife or screwdriver to remove any old putty residue from around the edges of your sinks before applying new putty.
10. Clean The Hole Left By The Old Drain Strainer
Cleaning up the hole left behind can be a tricky task. The first step is to take out any remaining pieces of the strainer that may have become stuck in the hole. Once this is done. Use a damp cloth to wipe away any dirt or debris that has accumulated inside over time. Next, use an all-purpose cleaner or bleach solution to disinfect and deodorize the area before rinsing thoroughly with warm water. Inspect to make sure that no metal fragments have left behind from previous cleaning attempts and then let dry completely before replacing with a new drain strainer.
11. Connect The Drain Pipe To The Kitchen Sinks Drain

Connecting a drain pipe to the kitchen sink drain is an easy do-it-yourself project that can complete with minimal tools. To begin, you will need to remove the kitchen drain pipe from the sink. This can do by loosening and unscrewing the nut that holds it in place. Once the old pipe has remove. You will want to clean up any debris or dirt that may have accumulated around the area. Where it was connected. You will need to measure and cut a new length of drain pipe that fits both ends of your connection points between your kitchen sinks and the wall or floor. Make sure to use high-quality PVC or ABS piping so that your connection is secure and leak-free.
12. Seal The Underside Of The Sink’s Drains Hole
Sealing the underside of a kitchen sink drain can help prevent unwanted odors, water damage, and pests from entering your home. Sealing the gutter hole is an easy maintenance task that should do. When you move into a new house or when replacing an old kitchen sink. The process for sealing a drain hole is simple. Remove the kitchen sink to access the underside of the drain opening. Use a utility knife to carefully cut away any insulation material around the area and then unscrew any mounting hardware. From here, take a piece of plumber’s putty and roll it into a long snake shape and wrap it atchround the edges of your new sink’s drain hole before screwing in any mounting hardware back in place.
13. Link The Drains Strainer With The Drainpipe

Linking the drain strainer with the drainpipe correctly can help make sure your sink stays clear. When waste and water are discharge from it. You’ll need to remove any existing parts that may be blocking access to the drainpipe. This may include unscrewing and removing nuts, screws, or clips that keep components in place. Ensure you have all necessary tools beforehand such as a wrench or screwdriver before attempting this task. Once everything has. remove and set aside. You can attach the strainer to the piping system by pushing it down into the opening of the pipe until it’s securely fastening.
Benefits Of Kitchen Sink Drains Remove
Having a clogged kitchen sink is an annoying and potentially expensive problem. When water isn’t draining properly, it can cause major inconveniences and damage your home. Fortunately, there are numerous benefits to having a kitchen sink drain remove installed in your home.
First of all, it ensures that the pipes remain in good condition since they will clear off any blockages or buildup that could lead to their eventual deterioration.
Additionally, it prevents odors from building up by flushing away food particles that would normally cause bad smells if left untreated for too long.
This also helps keep dishware clean since bacteria and dirt won’t have time to accumulate on them due to the regular maintenance cycle provided by gutter removal.
Complete The Kitchen Sink Drain Removal Process
The kitchen sink gutter removal process may seem daunting, but following these steps will make it simpler. Whether you are replacing an old kitchen sink or simply need to clear a clogged drain, this guide will help you complete the task quickly and safely.
First, make sure to turn off the water supply valves underneath the sink. Then locate the retaining nut that holds the kitchen sink drain pipe in place and use a basin wrench to loosen and remove it. After that is done. Carefully pull out the entire assembly from beneath your sink basin. This may require some wiggling as well as lifting in order to detach all parts of the pipe from its connections within the wall or cabinet.
Finally, inspect for any corrosion or damage on both ends of the tubing before reinstalling everything back together again with new washers and nuts if necessary.
Discover 54 of the best ideas on how to organize your galley kitchen. Get inspired and make the most of your space with these storage and decorating tips!
The Final Thoughts
Removing a kitchen sink gutter is not a difficult task. With the right tools and an understanding of the process, you can easily complete this task in less than one hour. Remember to wear protective gear such as gloves and safety glasses when working with plumbing and sharp objects. Additionally, make sure to turn off the water supply line before doing any work on your sink. It is important to double-check that all connections are secure before turning the water back on.